
Outdoor Lighting Installation in Oahu
Quick Summary:
Outdoor Lighting Installation in Oahu: Light Up Your Home the Right Way
What’s Covered on This Page
- What Outdoor Lighting Installation in Oahu Actually Involves
- Why Oahu’s Climate Demands the Right Outdoor Fixtures
- How to Prepare Your Property for Outdoor Lighting Installation
- What Happens During a Professional Outdoor Lighting Installation in Oahu
- How to Verify Your New Outdoor Lighting System Is Working Correctly
- How does Oahu’s salt air affect outdoor lighting systems?
- What happens during an outdoor lighting installation visit?
- Do I need a licensed electrician for outdoor lighting installation in Oahu?
- How should I prepare my property before the installation crew arrives?
- What types of outdoor spaces can you install lighting for?
- How long does outdoor lighting installation take on a typical Oahu home?
Need outdoor lighting installation?
Schedule Electrical Service. Call True Power Electrical Services now.
What Outdoor Lighting Installation in Oahu Actually Involves
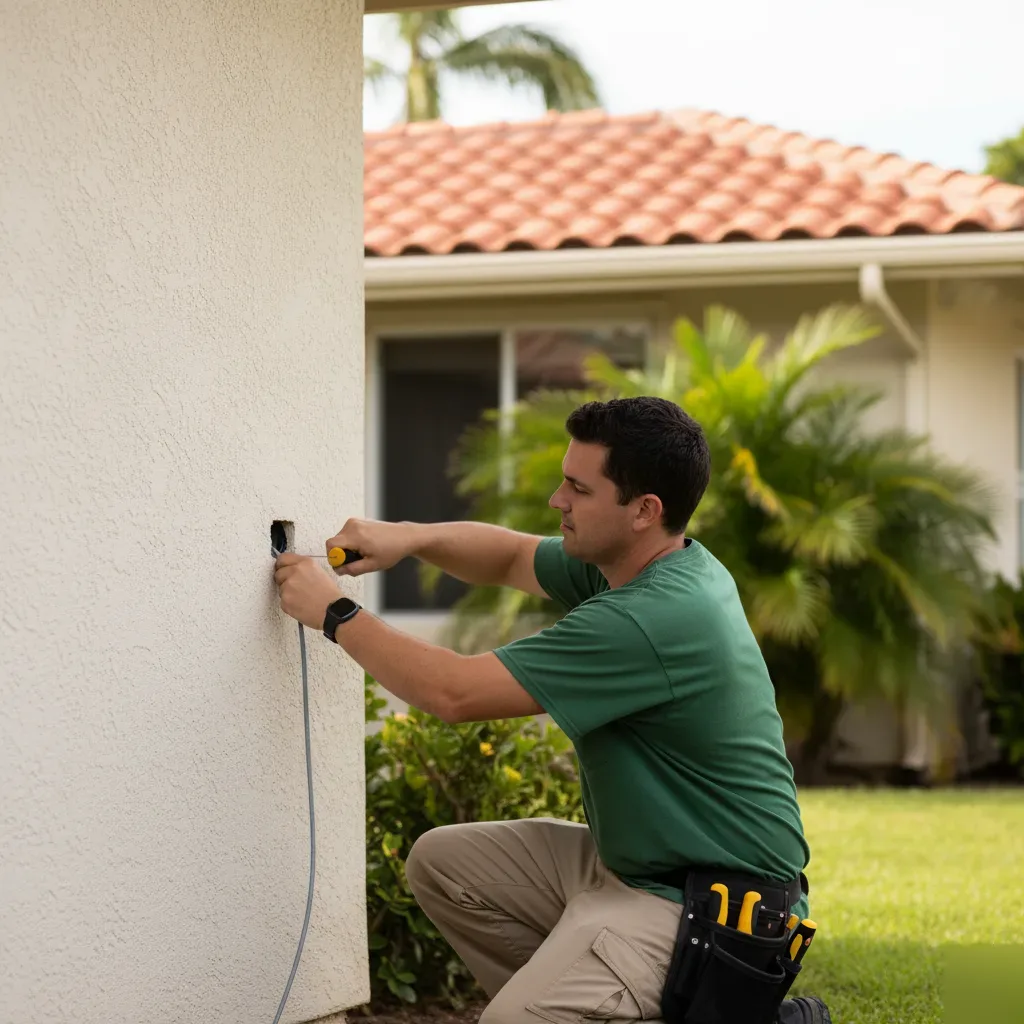
Most people picture screwing a light fixture into a wall. That’s maybe five percent of the job. Real outdoor lighting installation on Oahu means planning a full electrical system that holds up against salt air, heavy rain, and years of tropical sun. We’re talking about dedicated circuits, proper weatherproof connections, and fixtures rated for a coastal environment. Skip any of those steps and you’ll be replacing everything within a couple of years.
Here’s what a typical project looks like from our end. We start with a walkthrough of your property. We’re checking your existing electrical panel capacity, mapping out where new wiring needs to run, and figuring out which areas actually need light. Front entries, driveways, lanais, garden paths, pool decks. Each spot has different requirements. A pathway light near your Kailua home sits low to the ground and needs proper drainage around the base. A security floodlight mounted on a two-story wall in Hawaii Kai requires a completely different mounting approach and circuit load.
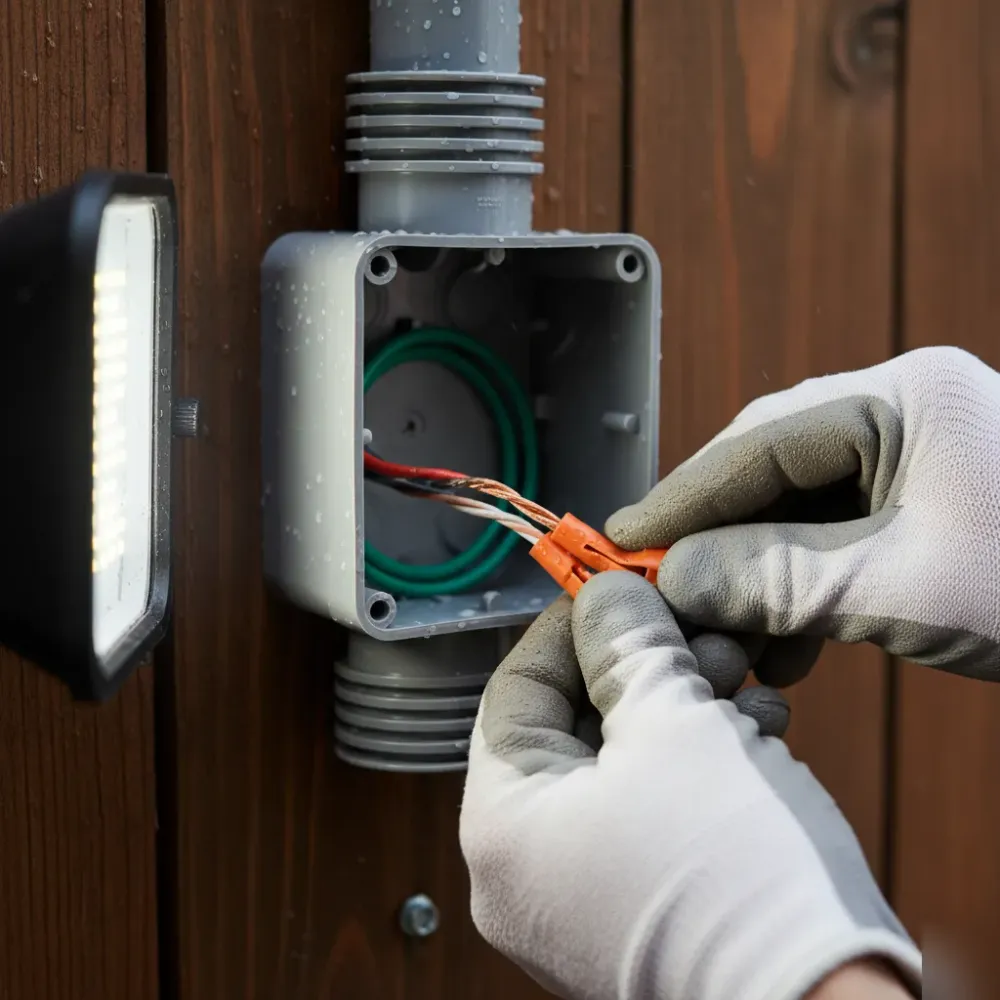
Then comes the electrical work itself. We run new circuits from your panel, install weatherproof junction boxes, and lay conduit where it’s exposed. Every connection gets sealed against moisture. That part matters more here than almost anywhere else in the country. The Department of Commerce estimates that corrosion costs billions annually across U.S. infrastructure, and coastal properties take the worst of it. We see corroded wire nuts and green-crusted terminals on Oahu constantly.
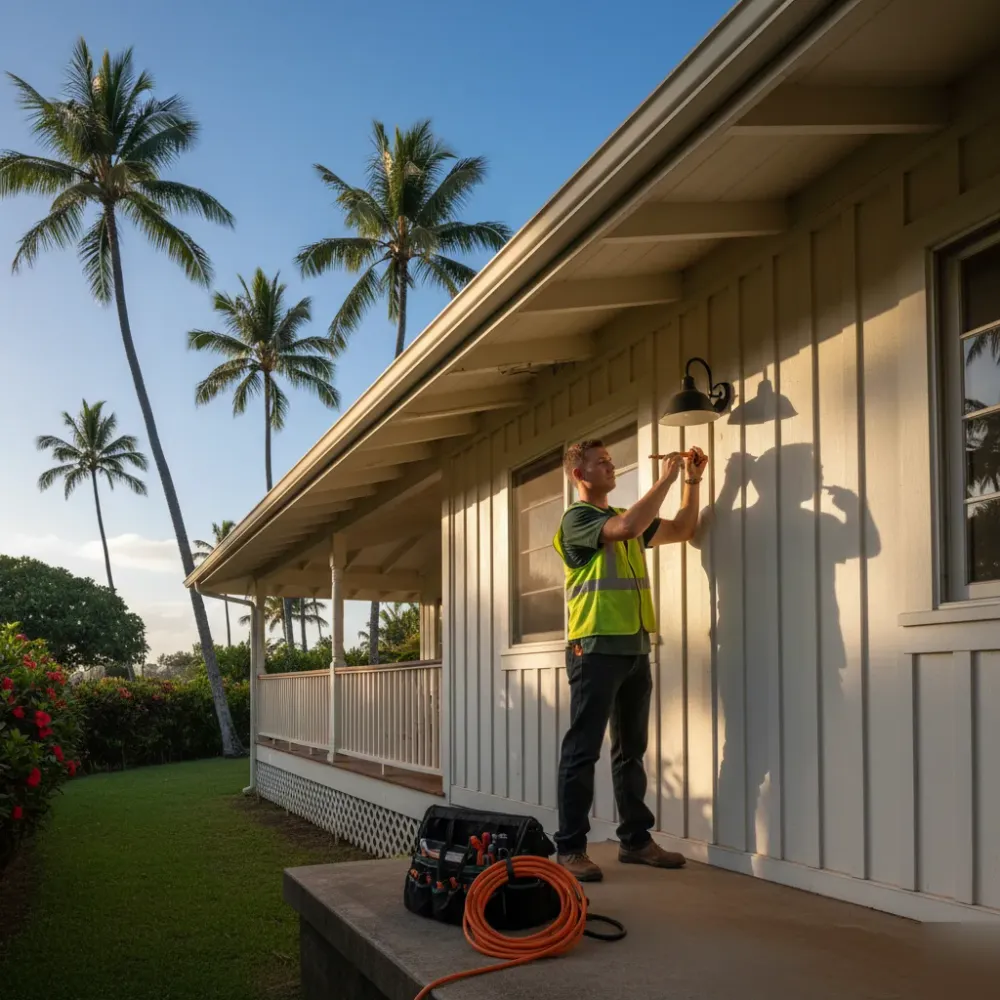
After wiring, we mount and aim each fixture. Landscape lights get buried leads and staked bases. Wall-mounted fixtures get lag-bolted into blocking, not just drywall anchors. We connect everything to switches, timers, or smart controls depending on what you want.
The final step is testing every circuit under load. We verify voltage at each fixture, check for ground faults, and make sure your GFCI protection trips correctly. Most of the time, we catch something during testing that saves a headache later. That’s the difference between a licensed electrician handling this and someone just winging it with hardware store parts.
Why Oahu’s Climate Demands the Right Outdoor Fixtures
Salt air destroys cheap fixtures. That’s the reality of living on Oahu, and we see the damage every single week. Homeowners call us after noticing corroded sockets, flickering path lights, or fixtures that simply stopped working after a year or two. The culprit is almost always the same. Someone installed mainland-grade fixtures that weren’t built for island conditions. our full range of electrical services our full range of electrical services
Oahu’s environment is tough on outdoor electrical components. You’ve got constant humidity, salt-laden trade winds, and UV exposure that doesn’t let up. Over in Kailua, properties closer to the windward coast take an even harder beating. According to the International Association of Certified Home Inspectors, salt spray corrosion can compromise electrical connections and create serious safety hazards in coastal environments. That’s not a distant concern here. That’s your backyard.
So what does the right fixture actually look like? It starts with the material. Marine-grade aluminum, solid brass, and copper hold up. Painted steel and thin zinc alloys don’t. We also look at the IP rating on every fixture we install. You want at least IP65 for anything exposed to rain and wind. Anything less and moisture gets inside the housing, corrodes the wiring, and creates a short circuit risk you won’t notice until something fails.
But it’s not just about the fixture itself. The wiring connections matter just as much. We use waterproof wire nuts, silicone-filled connectors, and corrosion-resistant junction boxes on every outdoor lighting installation across Oahu. Skipping those steps saves a few minutes on the job. It costs you hundreds in repairs later.
Here’s something most people don’t think about. UV degradation breaks down wire insulation over time. That afternoon sun beating down on exposed conduit near your lanai isn’t harmless. We run UV-rated conduit and position wiring in shaded channels wherever possible. Small decisions like that are the difference between a system that lasts three years and one that lasts fifteen. For a deeper look at how lighting placement and fixture selection interact with your home’s architecture, smart lighting strategies from the NAHB offer useful guidance on layering light effectively around exterior spaces.
Your outdoor lights should handle everything Oahu throws at them. Rain, salt, sun, humidity. If you’re exploring all the ways we help homeowners protect their electrical systems, check out our full range of electrical services for a broader picture. The right materials and code-compliant installation aren’t extras. They’re the bare minimum for this climate.
How to Prepare Your Property for Outdoor Lighting Installation
A little prep work on your end goes a long way. Before our crew arrives at your Oahu property, there are a few things you can do to help the job go smoothly and get your lights shining faster.
First, walk your yard. Really look at it. Note where your pathways are, where the dark spots feel unsafe, and which trees or architectural features you’d love to highlight. If you’ve got a lanai you use every evening, that’s worth mentioning. Same with a driveway that feels sketchy after sunset. We’ll do our own assessment, but your input matters. You live there. You know where the shadows bother you most.
Clear the areas where you want fixtures placed. Trim back overgrown hedges along walkways. Move potted plants or yard furniture away from the house perimeter. In neighborhoods like Kailua, we often see beautiful but dense tropical landscaping right up against exterior walls. That makes it tough to run low-voltage wire or mount fixtures cleanly. Even six inches of clearance helps.
Check your exterior electrical outlets and your panel. You don’t need to be an electrician for this. Just know where your outdoor outlets are and whether they work. If your breaker panel is in the garage, make sure we can access it. Homeowners often forget about a locked side gate or a storage shelf blocking the panel. Small thing, but it can slow the whole job down.
Got pets? Plan to keep them inside during the install. We’re running wire, digging small trenches, and using tools that aren’t pet-friendly. Same goes for sprinkler systems. Let us know where your irrigation lines run so we don’t accidentally hit one. A quick heads-up saves everyone a headache.
If your home is part of an HOA, check the guidelines before we start. Some communities on Oahu have rules about fixture height, brightness levels, or placement near property lines. We handle the electrical code side. But HOA rules are on you, and it’s better to sort that out before installation day rather than after.
Need help figuring any of this out? Give us a call.
Need help with outdoor lighting installation?
Schedule Electrical Service. True Power Electrical Services is ready to help.
What Happens During a Professional Outdoor Lighting Installation in Oahu
Most folks picture us just sticking lights in the ground. It’s way more involved than that.
Every job starts with a walkthrough of your property. We look at your home’s architecture, your landscaping, where shadows fall after sunset, and where you actually spend time outdoors. A lanai in Kailua that faces the Ko’olau Mountains needs a completely different approach than a front entry in Mililani. We map out fixture placement, wire runs, and transformer locations before anything gets installed. This planning step is what separates a professional result from a DIY job that looks uneven six months later.
Once we’ve got a plan you’re happy with, we start the physical work. We trench low-voltage wire along pathways, garden beds, and hardscape edges. Every connection gets waterproof fittings. That matters here on Oahu more than almost anywhere else because salt air and afternoon rain will destroy exposed wiring fast. We see corroded connections on nearly every system we’re called to repair. So we build ours to handle the climate from day one.
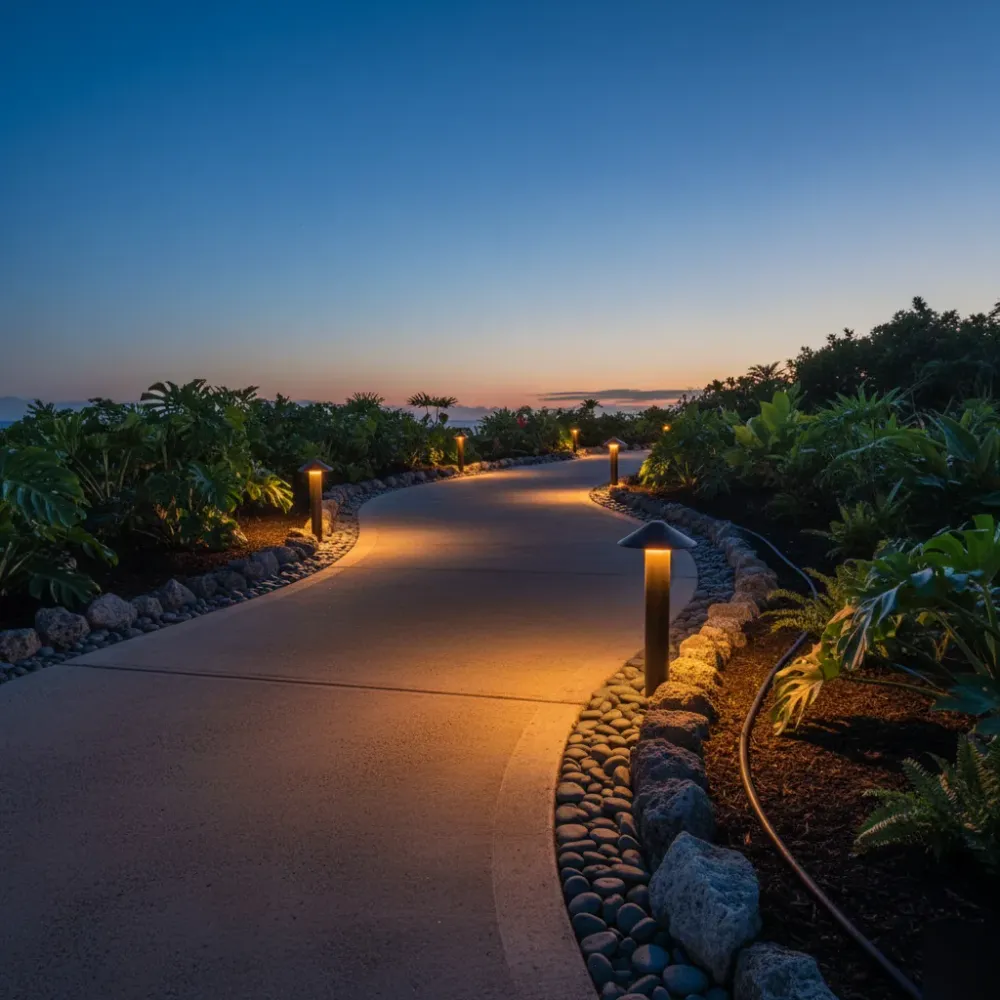
Fixture placement comes next. We position each light at the right angle and depth for the effect you want. Uplighting a coconut palm is different from washing light across a stone wall or marking the edge of a driveway. We adjust beam angles on site, not just guess from a catalog photo. Then we wire everything back to a transformer sized correctly for the total load, with room to add fixtures later if you decide to expand.
The final step is a full nighttime test. We turn the system on after dark and walk the entire property with you. We’re checking for hot spots, dark gaps, and glare that hits your eyes or your neighbor’s windows. Small tweaks during this walkthrough are common. A fixture tilted two inches can change the whole feel of a space. Our licensed electricians handle every connection to code, so you’re not worrying about safety down the road.
The whole process usually takes one day for most residential properties. You wake up the next morning with a yard that looks completely different after sunset.
How to Verify Your New Outdoor Lighting System Is Working Correctly
The install’s done. Now what? You don’t just flip a switch and walk away. A proper verification process makes sure every fixture, wire, and connection performs exactly as it should. We run through this with every Oahu homeowner before we leave the property.
First, we test each fixture individually. Every single one. We’re checking for consistent brightness, correct color temperature, and proper aim. A path light that throws a shadow in the wrong direction defeats the purpose. A spotlight that’s too harsh on your lanai makes the space uncomfortable instead of inviting. These small details matter more than people realize.
Then we look at the system as a whole after dark. This is the part most homeowners skip if they try a DIY approach. You can’t judge outdoor lighting at 2 p.m. You need full darkness to see hot spots, dark gaps, and glare issues. We schedule a nighttime walkthrough on every job we do in Kailua, Mililani, and across Oahu. There’s almost always something small that makes a big difference once it’s adjusted.
Voltage testing comes next. We measure the voltage at each fixture to confirm it falls within the correct range. Low voltage means dim output and shorter bulb life. High voltage creates excess heat and potential safety hazards. Our licensed electricians use professional meters to verify every connection point, not guesswork.
What about your timer or smart controls? We cycle through every programmed setting with you standing right there. Sunrise. Sunset. Manual override. Motion triggers if you’ve got them. You should know exactly how to operate your system before we leave.
Want to know something we see constantly? Loose wire nuts buried in mulch beds. They pass a quick test but fail within weeks from moisture exposure. We use waterproof connectors rated for Oahu’s humidity and salt air. Then we tug-test every single one.
Before we wrap up, we hand you a simple diagram showing fixture locations and transformer settings. If anything ever needs attention down the road, you’ll know exactly what’s where. That’s the kind of follow-through that separates a professional outdoor lighting installation from a weekend project.
Frequently Asked Questions
Common questions about outdoor lighting installation services in Oahu
How does Oahu’s salt air affect outdoor lighting systems?
Salt air corrodes cheap fixtures fast, and on Oahu, we see it happen within a year or two. Windward areas like Kailua take the hardest hit from salt-laden trade winds. That’s why we only use marine-grade aluminum, solid brass, or copper fixtures with IP65 ratings or higher. We also seal every connection with waterproof wire nuts and silicone-filled connectors. The right materials from the start mean your system lasts fifteen years instead of three.
What happens during an outdoor lighting installation visit?
We start with a full walkthrough of your property before touching a single wire. We check your electrical panel capacity, map where new circuits need to run, and talk through which areas matter most to you. Then we handle all the wiring, mount each fixture properly, and connect everything to your switches or smart controls. Before we leave, we test every circuit under load and verify your GFCI protection is working correctly.
Do I need a licensed electrician for outdoor lighting installation in Oahu?
Yes, and it matters more here than most places. Oahu’s coastal climate means every connection needs to be sealed against moisture and corrosion. A licensed electrician runs dedicated circuits from your panel, installs weatherproof junction boxes, and catches problems during load testing before they become safety hazards. Hardware store parts and DIY shortcuts fail fast in this environment. A licensed install protects your home and keeps you up to code.
How should I prepare my property before the installation crew arrives?
Walk your yard first and note the dark spots that bother you most. Clear the areas where you want fixtures placed and trim back overgrown hedges along walkways. Move potted plants or furniture away from the house perimeter. Dense tropical landscaping right against exterior walls, common in neighborhoods like Kailua, makes it harder to run wiring cleanly. A little clearing saves time and helps us get your lights up faster.
What types of outdoor spaces can you install lighting for?
We install lighting for front entries, driveways, lanais, garden paths, and pool decks across Oahu. Each space has different needs. Pathway lights need proper drainage around the base. Security floodlights on a two-story wall require a different mounting approach and circuit load. We plan each zone separately so every area gets the right fixture type, the right brightness, and the right protection for the conditions it faces.
How long does outdoor lighting installation take on a typical Oahu home?
Most residential outdoor lighting projects on Oahu take one to two days depending on the scope. A simple front entry and pathway setup moves faster than a full perimeter install with pool deck lighting and smart controls. We give you a clear timeline after the initial walkthrough. Prep work on your end, like clearing landscaping and knowing which areas you want lit, helps us stay on schedule and finish without delays.
Ready to Get Started?
Schedule Electrical Service Call (808) 427-7200 today.
